Written by Matt Rosenberger. Originally published on October 4th, 2020.
I created this demo (Github Link) to better understand Kubernetes (k8s for now on) and observe its load balancing in action. Using microk8s as the Kubernetes implementation and Artillery for load testing, load balancing worked as expected!
Note: This is not a Kubernetes tutorial. This write-up assumes you have experience with VMs and an understanding of k8s basics from their documentation.
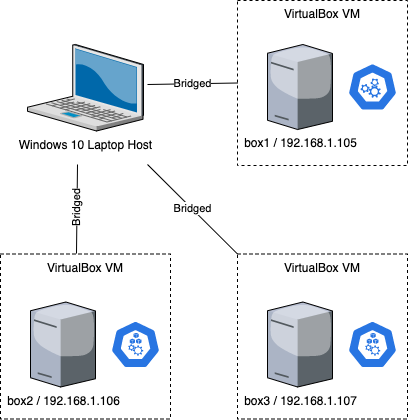
Running this demo was all done on my laptop that runs Windows 10 Home Edition. 3 VirtualBox virtual machines will be used for the k8s cluster.
Note: Every shell interaction in these VMs for this demo will be done as root.
Steps:On each VM, run
microk8s enable ha-clusterto make sure high availability is enabled. From here, follow microk8s' guide to clustering to create the cluster. In this demo, box1 is the primary node and box2 and box3 are the worker nodes.
For this demo, I wrote a Spring Boot application that generates passwords. A REST controller takes password policy as input and serves up passwords generated based on that policy. Tomcat port uses default port 8080.
I included a way to waste CPU if the hogCpuValue is set in the request. Setting this value to 30 will run random number generator 30,000 times for each password character generated. We need to do this so that load balancing occurs when a node is spending too much time on the API request.
server.tomcat.threads.max is set to 1 so that one instance of the running application will only process one API request at a time. I also include Spring Boot Actuator to properly shutdown the running Spring Boot Application and enabled it in the application.properties file.
With the application built (gradlew build) and working (gradlew bootRun), it's time to create the docker image. I SCP'd the fat jar (found in build/libs) over to the primary node along with the Dockerfile since I can't build docker images on Windows 10 Home Edition.
Note: From this point on, all Docker and k8s commands are run on the primary node (box1) through SSH
On the primary node, run
docker build . -t localhost:32000/password-gen:v1.0.0to build the image and
docker run -p 8080:8080 localhost:32000/password-gen:v1.0.0to run the image. If you have IntelliJ, you can run http_requests/request.http to test the running Docker container, and run http_requests/shutdown.http to shutdown the Docker container using the Spring Boot Actuator endpoint (after you modify the host to your primary VM address and port to 8080).
The Docker image needs to be uploaded to a Docker registry so that we can deploy it into k8s. Fortunately, microk8s ships with a Docker registry provided:
microk8s enable registry
docker push localhost:32000/password-gen:v1.0.0
Run the following to deploy the image to Kubernetes:
kubectl create deployment password-gen --image=localhost:32000/password-gen:v1.0.0. This will automatically create a deployment with the full name deployment.apps/password-gen. On deployment creation, only one pod is running in the k8s cluster. Run the following to run 6 pods in the cluster:
kubectl scale --replicas=6 deployment.apps/password-genPort 8080 needs to be exposed from k8s, so run
kubectl expose deployment.apps/password-gen --port=8080 --type=NodePortThen, to extract the exposed port that forwards to inside the containers' port 8080, run
kubectl get servicesand find the port that proceeds 8080: on the deployment.apps/password-gen line.
Change the ports in http_requests/request.http and http_requests/shutdown.http and rerun. You should get passwords generated when you run request.http. A pod should go down when running shutdown.http, but it will soon come right back up thanks to k8s.
Updating a deployment's image can be done with one command. Change the version to 1.0.1 in Application.java, build.gradle, and Dockerfile. Rebuild to get the new passwordgen-1.0.1.jar file, copy the updated Dockerfile and newly built jar file to where k8s is hosted. Rerun the docker build command setting version to 1.0.1 and then push the new docker version to the registry. To update the image, run
kubectl set image deployment.apps/password-gen password-gen=localhost:32000/password-gen:v1.0.1
Artillery will now be used to run the load test. Open load_test.yaml and update the port with the exposed port. When the load test runs, one request will be created every second for 20 seconds.
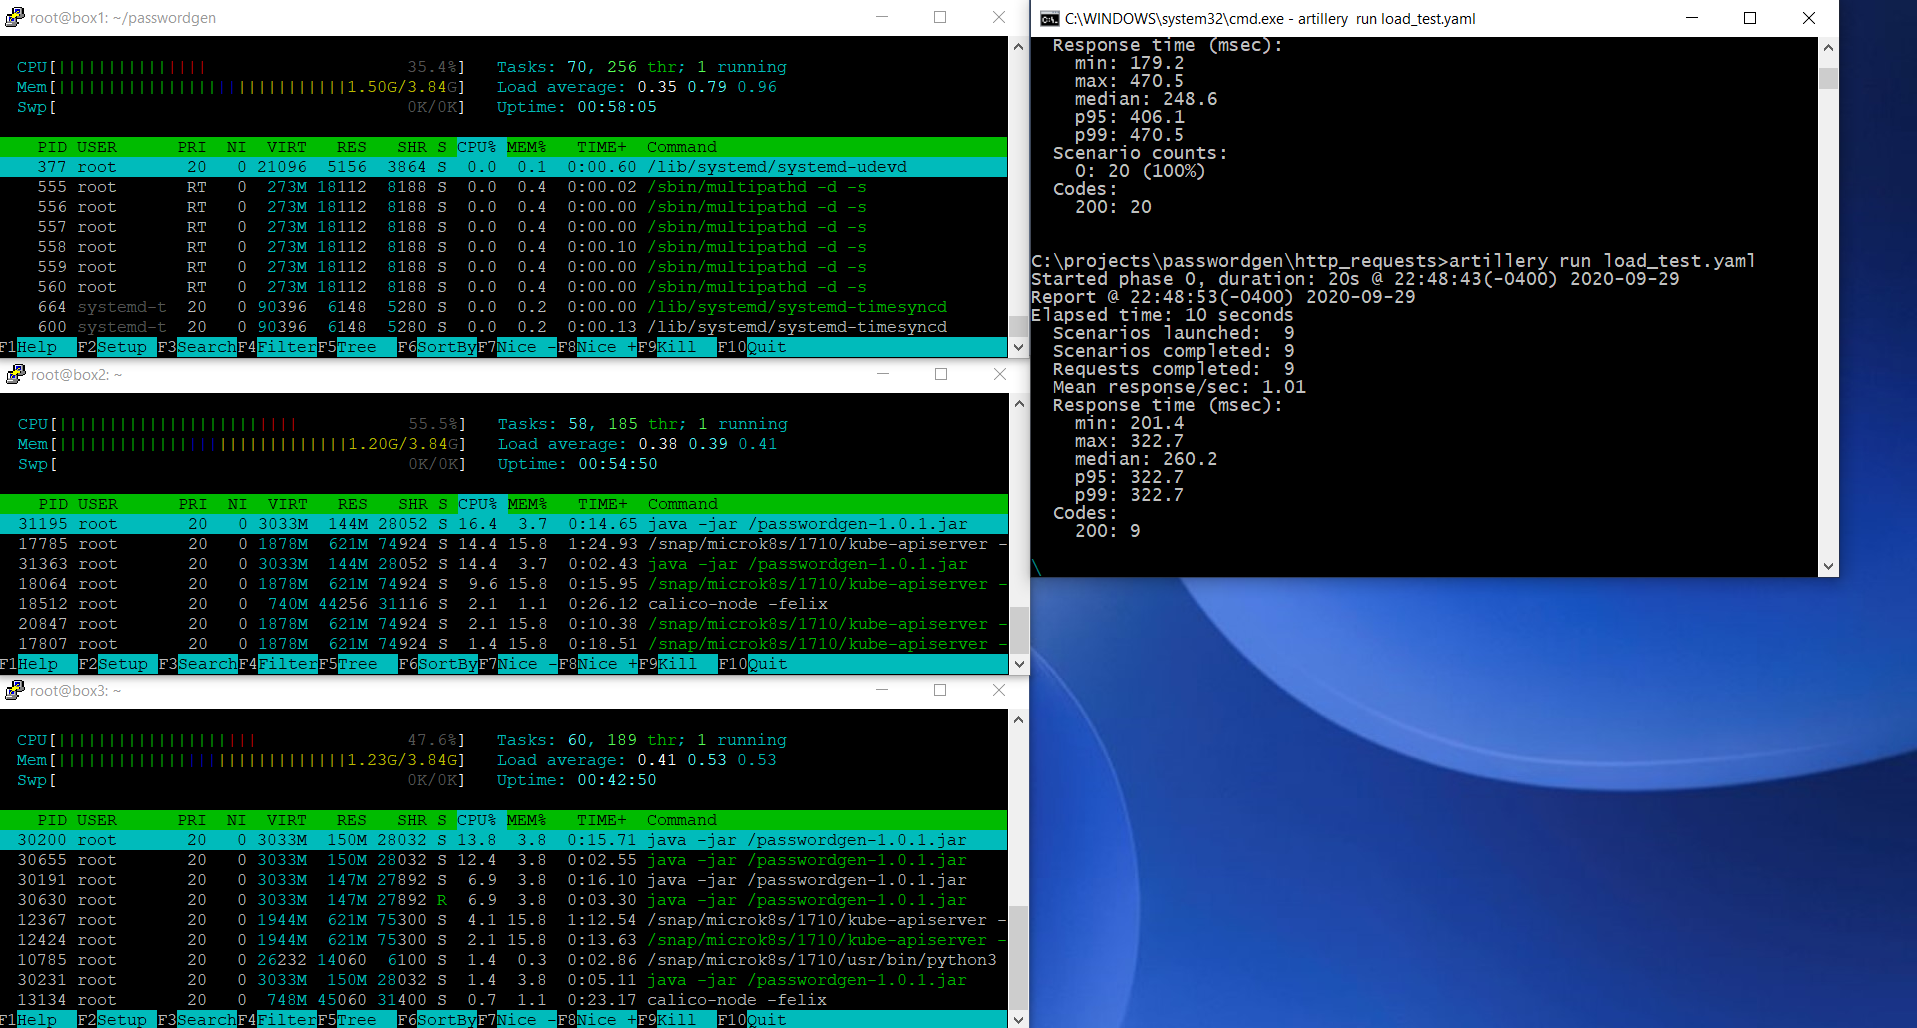
Before invoking the load test, go to each SSH session and run htop to observe activity on each VM node.
Now run
artillery run load_test.yaml
This screenshot has the 3 PuTTY sessions connected to each k8s clustered node on the left and Artillery execution on the right.
From the screenshot, load balancing is working. Observations running the load test multiple times:
This demo was a success! microk8s and docker installation couldn't be simpler. Learning a little bit of Artillery to get this load balancing demo setup maybe took an hour.
There are some approaches I would like to tweak with this demo:
If you have any questions about this demo, send me a Tweet @mattrr78!